Artwork Preparation
Best Artwork Creation Tips
It is sometimes confusing to generate Press Ready artwork file, especially once you new to designing. You need to keep following things in mind before submitting it to production.
Use Necessary Bleed In Design: Used about 3mm Bleed on all sided to avoid having white or not printed areas in final product. Bleed is just same colour or design extension through cutting line to have finished printed products.
Avoid Stretched or Squeezed or Low Resolution Images: Try to save you images in High Resolution , TIFF or EPS version if possible. Minimum allowable resolution must be 300DPI, Low than that may blur your image. Supply us with Correct size artwork which means very big print from small image will result in pixileration. If you have text in images please make sure it’s resolution is at-least 400 DPI
Avoid up’s in your Artwork: Once supplying with your design do not do Up’s as they are adjusted during production. Ups can create unnecessary big file
Outline / Curve / Group Fonts !! Avoid Missing Fonts? Most of the designers use specific fonts and forget to curve it before sending it for printing. You can need to curve / Object / Group the fonts to avoid missing fonts for printing
Colour Matching & Selection
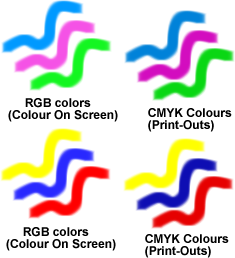
Computer version of Colour (RGB) and Printing (CMYK) is different. RGB colours are bright and CMYK colours are relatively dull. RGB colours look brighter with computer screen light. Electronic devices use RBG (Red, Green and Blue) colours to create image whereas printing use full colours to create an image. Cyan (blue), Magenta (red), Yellow and Black (called “CMYK”). Now these are entirely different colouring types and file needs to be converted to CMYK before printing. This may be done using editing program like Photoshop or Corel Draw. If you need help for colour conversions you can visit colour matching section of our website to match colours or you can ask our professionals help
Sometimes you may come across RGB colours which cannot be converted to CMKY colours and some other times your high resolution RGB image do not suffer colour change during printing. Colour photos don’t suffer much from CMYK translation

RGB picture
(Computer Image)

CMYK picture
(Printout)
Dealing with Coloured Small Text and LinesDo not colour small text or do not put colourful boundaries on entirely small text. As every printing process has some variations e.g in offset printing. CMYK colours are processed in steps and once there is small text converted to CMYK it may look blur or highly thin outline may not fit together and with printing it may look bad.
All lines in your artwork should at-least be 0.3pt and all text should be at least 8pt using a non-narrow, non-ultra light or non-thin style font.

Text Over ImagesWatered Mark images work best as background for text, otherwise that may look mixed up. 
Getting Printable File or Not Sure? If you are not sure about your file resolution or details email us and we should be able to help you in checking or editing your file. sales@beeprinting.com.au
- GOOD: TIF or EPS files .
- BAD: JPEG/JPG or GIF


